Unlocking Potential: Exploring Frida & Objection on Non-Jailbroken Devices without Application Patching
As we saw in the previous article Assessing Security Risks of Local Storage on Non-Jailbroken iOS Devices that how we can install the “FilzaEscaped” on the Non-Jailbroken device and test for all the Local Storage related issues related to the iOS application. Now another question may be raised in your mind to perform fingerprint bypasses, SSL Pinning bypasses, dumping keychain data, running custom Frida script, or perform runtime manipulation in multiple cases, Can we run Frida & objection on the non-jailbroken iDevice? Can we perform Frida tracing? Can we inject our own Frida scripts? and many more things that we do on our jailbroken iDevices. The answer is Yes, and the Solution for it is “libimobiledevice”. So in this Part 2, we will see How we can Run Frida & Objection on the Non-Jailbroken Device without patching the Application!
What is libimobiledevice?
A cross-platform protocol library to communicate with iOS devices using native protocols.
There are 2 methods to use Frida on the Non-Jailbroken Device:
- Without Patching the Application: (Windows/Linux/MacBook)
- Patching the Application: (Windows/Linux/MacBook): This method is the common method and many security experts have already explained it in different articles so not covering it in this article.
What is Frida?
Frida is a Dynamic instrumentation toolkit for developers, reverse-engineers, and security researchers.
What can we do with Frida?
- Can Inject our own scripts into black box processes.
- Can hook into any function, spy on crypto APIs, or trace private application code, no source code is needed.
- Can edit, hit save, and instantly see the results. All without compilation steps or program restarts.
Note: This method can be applied to all the applications which are debuggable.
Without Patching the Application: (Windows/Linux/MacBook):
Pre-Requisite:
- The iOS device should have iOS 13 or 13+ iOS version.
- The Developer Disk Image must be mounted. Xcode will mount it automatically as soon as it discovers the iOS USB device, but you can also do it manually by using ideviceimagemounter.
- Download the latest Gadget and it should be kept in the user’s cache directory.
- User’s cache directory Windows:
- C:\Users\{yourusername}\AppData\Local\Microsoft\Windows\INetCache\frida\gadget-ios.dylib
- User’s cache directory Linux:
- /root/.cache/frida/gadget-android-arm64.so
- User’s cache directory macOS:
- ~/.cache/frida/gadget-ios.dylib
- Lightning cable (for connecting the device to your computer).
Steps to Install Frida on Windows/Linux/Mac machine:
Install the latest Frida and objection in your system by using the below-mentioned command:
While writing this article the latest version for Frida is 16.1.3
pip3 install frida
pip3 install frida-tools
pip3 install objection
Download libimobiledevice:
For Windows machines, navigate to the below-mentioned URL and download libimobiledevice (libimobiledevice.1.2.1-r1122-win-x64.zip):
https://github.com/libimobiledevice-win32/imobiledevice-net/releases/Extract the “libimobiledevice.1.2.1-r1122-win-x64.zip” file contents and open the command prompt in the same directory. (If you want to access this tool from any location in the machine you can set the “libimobiledevice.1.2.1-r1122-win-x64” path to Windows Environment Variables).
For Linux Machines, navigate to below-mentioned URL and follow the steps to install libimobiledevice:
Install Dependencies:
Open the terminal and enter the below-mentioned commands:
$ sudo apt-get install \
    build-essential \
    checkinstall \
    git \
    autoconf \
    automake \
    libtool-bin \
    libplist-dev \
    libimobiledevice-glue-dev \
    libusbmuxd-dev \
    libssl-dev \
    usbmuxd
Build:
Enter the below-mentioned commands to build:
$ ./autogen.sh \
    --prefix=/opt/local \
    --enable-debug
$ make
Install:
Enter the below-mentioned commands to install:
$ sudo make installFor a Mac machine, enter the below-mentioned command to install libimobiledevice:
brew install libimobiledeviceDownload the Developer Disk Image:
Navigate to the below-mentioned GitHub repository and download the developer disk images according to your iPhone’s iOS version. Here I am downloading 16.1.zip.
https://github.com/mspvirajpatel/Xcode_Developer_Disk_Images/releases/or
https://github.com/haikieu/xcode-developer-disk-image-all-platforms/tree/master/DiskImages/iPhoneOS.platform/DeviceSupportNote: If your iOS version does not have a developer disk image available, you should select the version immediately preceding it for downloading or any relevant purposes.
Extract the content of the downloaded 16.1 zip file.
Let’s confirm if the tool is functioning properly or not:
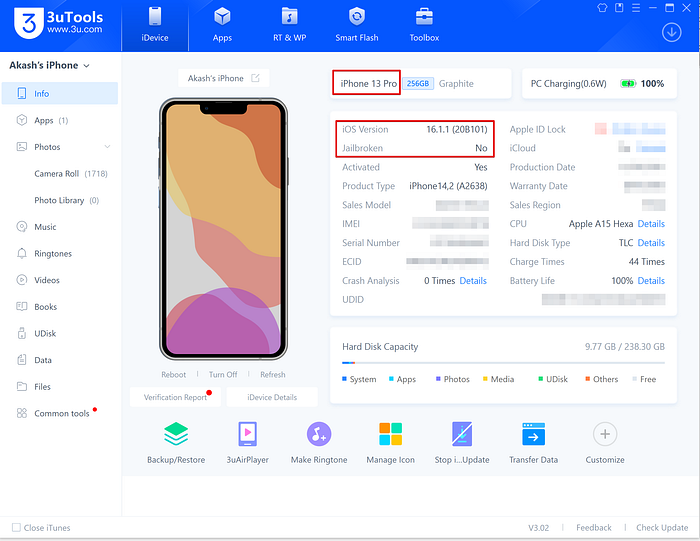
Connect your iOS device to your Windows machine.
Observe that the connected iDevice is non-jailbroken.
Open the command prompt and enter the below-mentioned command:
idevicepair pair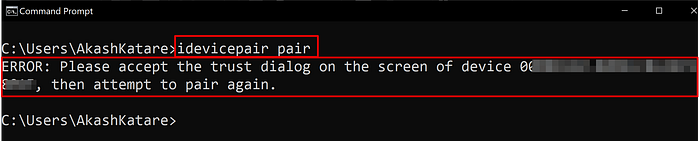

Check your iDevice it will be prompted you with a popup window to “Trust This Computer” Click on the “Trust” button.
Run the same command again and observe the output on the command prompt, it will show that the iDevice is connected properly now.

Mounting the Developer Disk Image on the Non-Jailbroken iDevice:
Navigate to the extracted folder of Developer Disk Image and open the command prompt in the same folder.
Enter the below-mentioned command to mount the developer disk image:
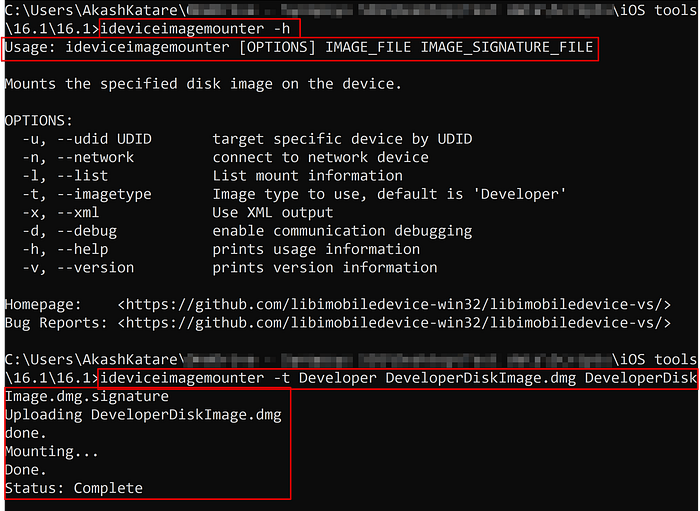
For help: ideviceimagemounter -h
Usage: ideviceimagemounter [OPTIONS] IMAGE_FILE IMAGE_SIGNATURE_FILE
Example: ideviceimagemounter.exe -t Developer DeveloperDiskImage.dmg DeveloperDiskImage.dmg.signature
Once the developer disk image is properly mounted command prompt will look like as below:
Or
Enter the below-mentioned command to List mount information:
ideviceimagemounter -l
Running Frida on the Non-Jailbroken iDevice:
For demonstration purposes, I am using the DVIA v2.0 iOS application. You can navigate to the below-mentioned repository and install the application into your non-jailbroken iDevice using Sideloadly.
DVIA v2: -
https://github.com/prateek147/DVIA-v2/releases/tag/v2.0Sideloadly:
https://sideloadly.io/#downloadSetup fingerprint/faceid on your iDevice.
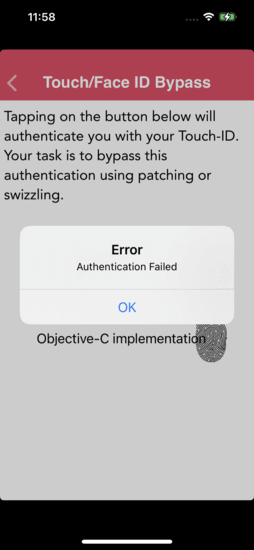
Launch the DVIA v2 application and navigate to the “Touch/Face ID Bypass” module.
Click on the “Swift Implementation” button and try to provide the wrong fingerprint/faceid and then click on the cancel button.
Observe that application responded with an error “Authentication Failed”.
Open the command prompt and run the below-mentioned command to list all the running processes with the application package name.
frida-ps -UaOnce you get the application package name as the output of the previous command, issue the following command to bypass fingerprint/faceid authentication.
frida -U -f com.highaltitudehacks.DVIAswiftv2 -l bio3.js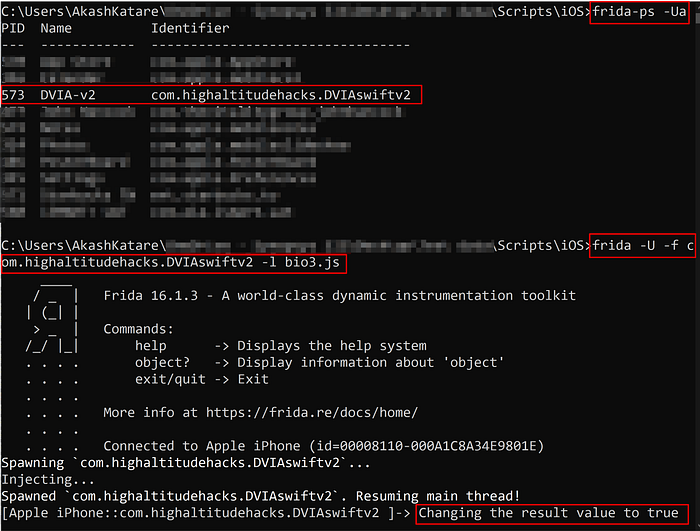
Repeat step 2.
Observe on the command prompt that Frida changed the result value to true, which indicates that the fingerprint/faceid authentication has been bypassed.

Similarly, we can inject our own scripts to perform testing.
Running Objection on the Non-Jailbroken iDevice:
Navigate to the below-mentioned URL and download the (frida-gadget-16.1.3-ios-universal.dylib.xz) file.
https://github.com/frida/frida/releasesExtract the contents of the “frida-gadget-16.1.3-ios-universal.dylib.xz” file and rename “frida-gadget-16.1.3-ios-universal.dylib” to “gadget-ios.dylib” and move this file to a below-mentioned folder. If Frida folder is not created you can create it manually.
C:\Users\AkashKatare\AppData\Local\Microsoft\Windows\INetCache\frida\For demonstration purposes, I am using the DVIA v2.0 iOS application.
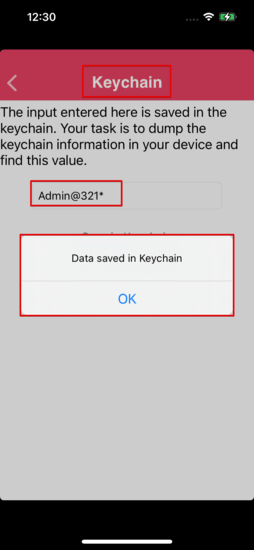
Launch the DVIA v2 application and follow the below-mentioned functional path:
Local Data Storage -> Keychain
Enter some value and click on the “Save in Keychain” button.
Enter the below-mentioned command to inject Frida Gadget into the process and start the objection:
objection -g com.highaltitudehacks.DVIAswiftv2 exploreEnter the below-mentioned command to Dump the keychain Data:
# ios keychain dump --json dvikeychain.json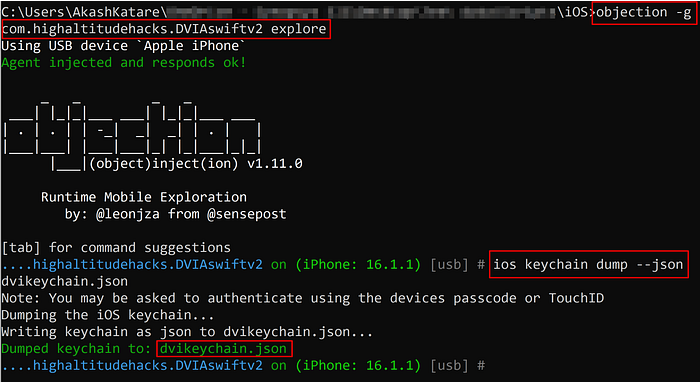
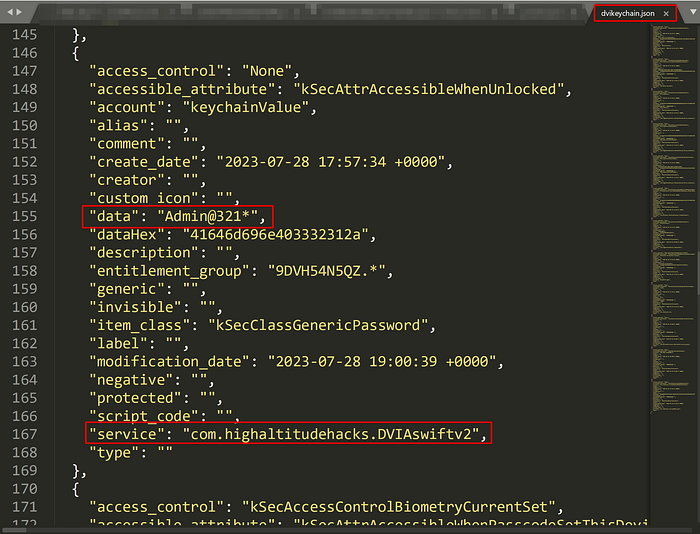
Open the dumped JSON file in any text editor and observe that the sensitive data is being got stored in the keychain.
Thank you for taking the time to read this article. Your engagement is truly appreciated! If you encounter any challenges, please feel free to share them in the comments section. I’m here to assist and will work towards addressing them in the Troubleshooting section. Your applause and support are welcomed and valued!
Linkedin: https://www.linkedin.com/in/akash-katare-382802117
Twitter: https://twitter.com/AkashKatare18

